실험 기록, 프로젝트 관리, 모델 관리에 유용한 라이브러리인 mlflow를 소개하고자 한다.
MLflow - A platform for the machine learning lifecycle
An open source platform for the end-to-end machine learning lifecycle
mlflow.org
<주요기능>
① 추적 : 기록, 쿼리 실험 (코드, 데이터, 구성, 결과)
② 프로젝트 : 모든 플랫폼에서 실행을 재현할 수 있는 형식으로 데이터 과학 코드 패키징
③ 모델 : 다양한 제공 환경에서 기계학습 모델 배포
④ 모델 레지스트리 ; 중앙 레포지토리에서 모델 저장, 주석, 검색 및 관리
<Tracking API를 가져다가 실험 로그 남기기>
import os
from random import random, randint
from mlflow import log_metric, log_param, log_artifacts

if__name__=="__main__":
	#로그 파라미터
	log_param("param1", randint(0,100))

    #로그 매트릭
    log_metric("log text", random())
    log_metric("log text", random() + 1)
    log_metric("log text", random() + 2)

    #로그 아티팩트(output file)
    if not os.path.exists("outputs"):
    	os.makedirs("outputs")
    with open("outputs/text.txt", "w") as f:
    	f.write("hello world")
    log_artifacts("outputs")
<Iris 데이터셋, 사이킷런의 RandomForestClassifier 를 사용한 예제 >
import pandas as pd
from sklearn import datasets
from sklearn.ensemble import RandomForestClassifier
import mlflow
import mlflow.sklearn
from mlflow.models.signature import infer_signature
from mlflow.types.schema import Schema, ColSpec

iris = datasets.load_iris()
iris_train = pd.DataFrame(iris.data, columns=iris.feature_names)
clf = RandomForestClassifier(max_depth = 7, random_state = 0)
clf.fit(iris_train, iris.target)

input_schema = Schema([
	ColSpec("double", "sepal length (cm)"),
    ColSpec("double", "sepal width (cm)"),
    ColSpec("double", "petal length (cm)"),
    ColSpec("double", "petal width (cm)"),
])

output_schema = Schema([ColSpec("long")])
signature = ModelSignature(inputs = input_schema, outputs=output_schema)
input_example = {
	"sepel length (cm)" : 5.1,
    "sepel width (cm)" : 3.5,
    "petal length (cm)" : 1.4,
    "petal width (cm)" : 0.2,
}

mlflow.sklearn.log_model(clf, "iris_rf", signature=signature, input_example=input_example)
mlflow.sklear.save_model(path = "iris_rf", sk_model = clf)
이렇게 모델을 저장하고
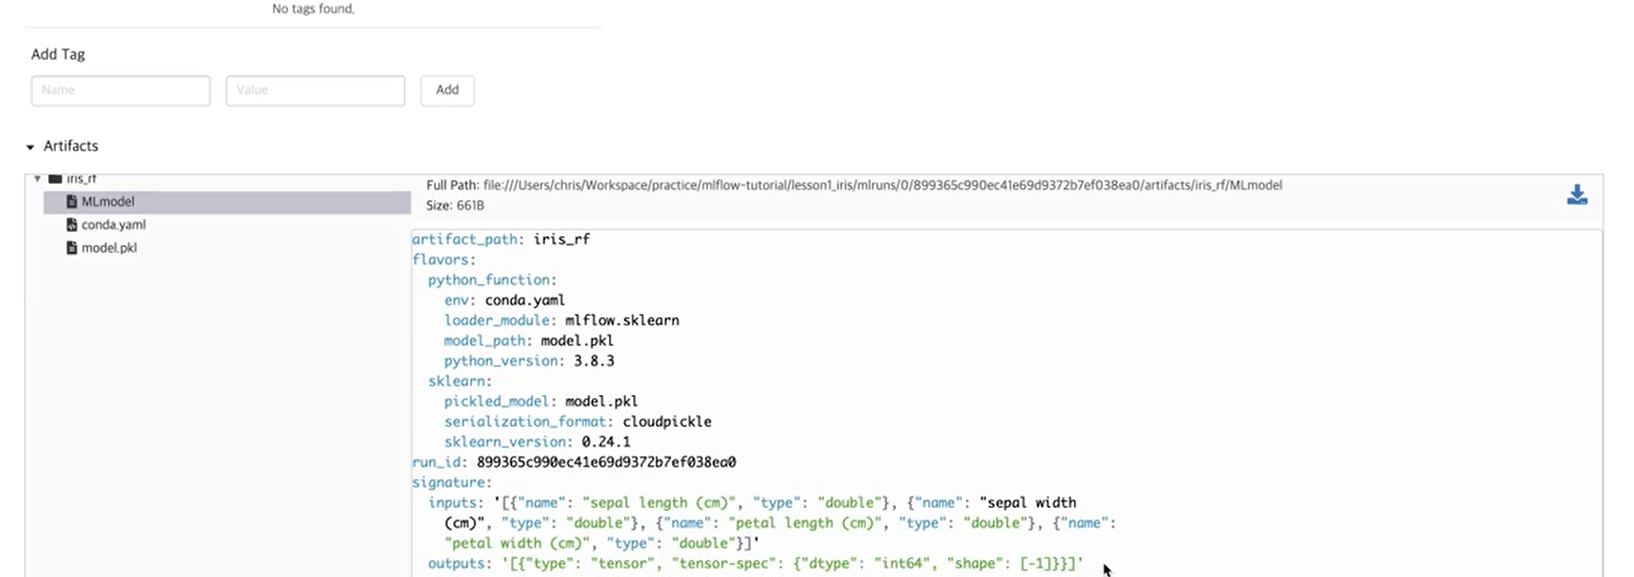
대시보드에서 확인한 뒤
$ mlflow models serve -m iris_rf -p 1234 #포트번호 1234이렇게 모델을 서빙하면 된다.
curl --location --request POST 'localhost:1234/invocations' \
--header 'Content-Type : application/json' \
--data-raw '{
	"columns" : ["sepal length (cm)" , "sepal width (cm)" , "petal length (cm)" , "petal width (cm)"],
    "data" : [[5.1, 3.5, 1.4, 0.2]]
}'
쉘을 통해 rest api 처럼 호출.
<mnist 데이터 텐서플로우 딥러닝 모델 저장방법>
import tensorflow as tf
from tensorflow.keras.layers import Conv2D, MaxPooling2D, Dense, Flatten
from tensorflow.keras.optimizers import SGD
import mlflow
import mlflow.keras
from mlflow.models.signature import infer_signature

(train_X, train_Y), (test_X, test_Y) =
tf.keras.datasets.mnist.load_data()
trainX = train_X.reshape((train_X.shape[0], 28, 28, 1))
testX = test_X.reshape((test_X.shape[0], 28, 28, 1))
trainY = tf.keras.utils.to_categorical(train-Y)
testY = tf.keras.utils.to_categorical(test_Y)

model = tf.keras.models.Sequential()
model.add(Conv2D(32, (3,3), activation ='relu',
kernel_initializer='he_uniform', input_shape=(28, 28, 2)))

model.add(MaxPooling2D((2,2)))
model.add(Flatten())
model.add(Dense(100, activation='relu', kernel_initializer='he_uniform'))
model.add(Dense(10, activation='softmax'))
opt=SGD(lr=0.01, momentum=0.9)
model.compile(optimizer=opt, loss='categorical_crossentropy', metrics=['accuracy'])
model.fit(trainX, trainY, epochs=1, batch_size=32, validation_data=(testX, textY))

signature = infer_signature(testX, model.predict(testX))
mlflow.keras.log_model(model, "mnist_cnn", signature=signature)
<파이썬 함수 모델 등록 예제 (커스텀 모델)>
모델소스
import mlflow.pyfunc

#모델 클래스 정의
class AddN(mlflow.pyfunc.PythonModel):

	def __init__(self, n):
    	self.n = n

    def predict(self, context, model_input) :
    	return model_input.apply(lambda column:column + self.n)

#모델 구성 및 저장, 특정한 숫자를 더해주는 모델
model_path = "add_n_model"
add5_model = AddN(n=5)
mlflow.pyfunc.save_model(path = model_path, python_model = add5_model)

loaded_model = mlflow.pyfunc.load_model(model_path)

#모델 평가
import pandas as pd
model_input = pd.DataFrame([range(10)])
model_output = loaded_model.predict(model_input)
assert model_output.equals(pd.DataFrame([range(5, 15)]))
쉘 실행
curl --location --request POST 'location:1234/invocations' \
--header 'Content-Type:application/json' \
--data-raw '[4]'
<Iris 데이터 XGBoost 모델 예제 (파이썬 커스터마이징)>
모델 소스 작성
from sys import version_info
import xgboost as xgb
from sklearn import datasets
from sklearn.model_selection import train_test_split

PYTHON_VERSION =
"{major}.{minor}.{micro}".format(major=version_info.major, minor=version_info.minor, micro=version_info.micro)
iris = datasets.load_iris()
x = iris.data[:,2:]
y = iris.target
x_train, x_test, y_train, _ = train_test_split(x, y, test_size=0.2, random_state=42)
dtrain = xgb.DMatrix(x_train, label=y_train)

#모델 학습 및 저장
xgb_model = xgb.train(params={'max_depth' : 10}, dtrain=dtrain, num_boost_round=10)
xgb_model_path = "xgb_model.pth"
xgb_model.save_model(xgb_model_path)

artifacts = {
	"xgb_model" : xgb_model_path
}

#모델 클래스 정의
import mlflow.pyfunc
class XGBWrapper(mlflow.pyfunc.PythonModel):

	def load_context(self, context):
    	import xgboost as xgb
        self.xgb_model = xgb.Booster()

self.xgb_model.load_model(context.artifacts["xgb_model"])

	def predict(self, context, model_input):
    	input_matrix = xgb.DMatrix(model_input.values)
        return self.xgb_model_predict(input_matrix)

#Conda 환경 설정
inport cloudpickle
conda_env = {
	'channels' : ['defaults'],
    'dependencies' : [
    	'python={}'.format(PYTHON_VERSION),
        'pip',
        {
        	'pip' : [
            	'mlflow',
                'xgboost=={}'.format(xgb.__version__),
                'cloudpickle=={}'.format(cloudpickle.__version__),
            ],
        },
    ],
    'name':'xgb_env'
}

#Save the MLflow Model
mlflow_pyfunc_model_path = "xgb_mlflow_pyfunc"
mlflow.pyfunc.save_model(
	path = mlflow_pyfunc_model_path,
    python_model = XGBWrapper(), artifacts = artifacts,
    conda_env = conda_env
)

#파이썬함수 형태 모델 로드
loaded_model = mlflow.pyfunc.load_model(mlflow_pyfunc_model_path)

#모델 평가
import pandas as pd
test_predictions =
loaded_model.predict(pd.DataFrame(x_test))
print(test_predictions)
모델 서빙 쉘 스크립트
mlflow models serve -m xgb_mlflow_pyfunc -p 1234
모델 호출
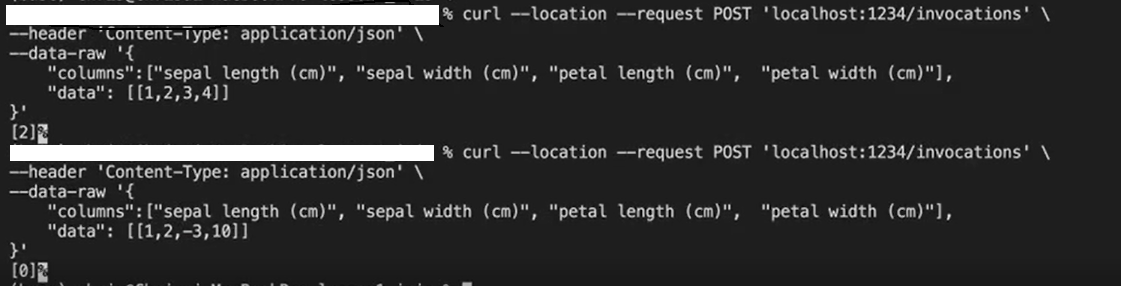
curl --location --request POST 'localhost:1234/invocations' \
--header 'Content-Type:application/json' \
--data-raw '{
	"columns" : ["sepal length (cm)","sepal width (cm)","petal length (cm)","petal width (cm)"],
    "data" : [[1,2,3,4]]
}'
<XGBoost Iris 모델 레지스트리 등록 예제>
데이터베이스 필요 (sqlite 로 간단히 만듦)
$ mlflow server --backend-store-uri sqlite:///sqlite.db --default-artifact-root ~/mlflow
$ source mlflow_host.sh
$ export MLFLOW_TRACKING_URI=http://localhost:5000